The Horizon Manhattan Nano satellite meter does what ordinary sat finders can’t do: it points the way to the correct satellite - and then confirms that you have found it.

The latest developments in satellite identification technology have been packed into the Horizon Manhattan Nano satellite meter. The clear and easy to read display ensures perfect dish alignment every time.
Its unique satellite direction system shows you which direction to move your dish in order to find your chosen satellite and will only look for the satellite you have selected.
In this article you can read campervanstuff’s detailed description of our own tests with the Nano.
Click the gallery link take a look at the PHOTO GALLERY which shows more views of the Nano and includes a video of it in action.
What do you do with it?
The Nano is plugged in between your satellite dish and your satellite receiver. It has a single button which allows you to select a specific satellite that you want to search for.
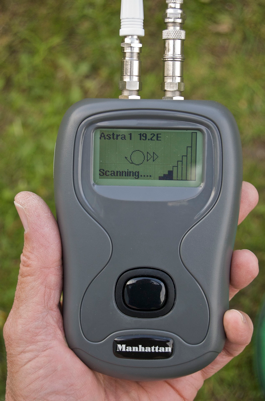
As you move the dish about the Nano registers the signal from any satellites which the dish encounters; it then uses this information to calculate which direction and how far you need to turn the dish in order to locate your desired satellite and displays it on the screen as a simple graphic guide.
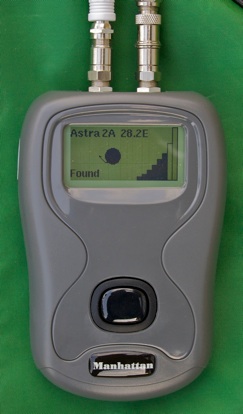
The direction (left or right) is indicated via triangles and the distance by the number of triangles, ranging from four (far away) to one (very close). At the same time a signal strength bar will react to each satellite that the dish points at.
Follow the indicators on the screen: when (and only when) the dish reaches the target satellite, the satellite icon in the centre of the screen turns black and a melody is played - music to your ears because it guarantees that the dish is pointed at the correct satellite.
If ever you have spent time getting very frustrated because an ordinary sat finder (or your receiver’s strength indicator) displays a strong signal but you can’t get any pictures, often it’s because you are pointing at the wrong satellite.
With the Nano there is no doubt.
The Nano in detail
The unit comes with everything you need so you can begin using it right away.
The box contains the unit and a protective carrying case; it can be used with the case on because it has a clear PVC window so that you can see the screen. For our tests we preferred to use it out of the case so that we got the best impression of the screen clarity - which is very good.
Also included is a 1.5m length of co-ax cable, with connectors at both ends; a USB cable which allows you to connect to your PC if you want to download a different set of satellite positions; and an instruction booklet.
The Nano has the default UK pack of satellites already installed as standard, allowing you to choose between four satellite positions:
(NB please note that current (September 2012) satellite changes around the 28.2E position mean that these identifiers are changing but a software updater is available and the latest default pack is installed on new Nano models)
-
•Astra 28.2 A-B [Updater 28.2 2-B] (European beam)
-
•Astra 28.2 D [Updater 28.2 1-N] (UK narrow beam)
-
•Astra 19.2
-
•Hotbird 13.2
Pardon us ..
.... if we go into too much detail and thereby make the Nano sound complicated to use - when in fact the opposite is true. But after all, this is an account of our detailed testing and we hope that you will find the information helpful if you are thinking of buying one; or just interesting anyway.
If you’ve ever struggled to locate a satellite this could be music to your ears.
It’s the first two of these satellites that most UK users would be interested in most of the time because they carry the UK channels; but for those travelling in Europe the ability to find the other two satellites easily means that you can readily switch to alternatives once you get out of range of the UK channels.
There are also free downloadable alternative satellite packs available for the Nano; by installing these you can replace the standard four satellites with a different group, if required.
These packs are available to download to your PC; they can then be installed on your Nano by connecting it via the supplied USB cable and following the instructions in the user manual.
See later in this article for details about the content of these packs and for our description of the install process which we have tested and found to be very easy.
Setting up
The user manual gives clear, easy to follow instructions and the unit is very simple to set up. It does not have internal batteries but gets its power from the receiver. Connection to the dish and the receiver is via standard satellite cable F-connectors, so the existing cable from the dish can be unplugged from the receiver and plugged into the Nano instead; the supplied extra cable is then plugged in between the other terminal on the Nano and the receiver’s connection point.
You might want to insert the Nano in alternative positions between the dish and the receiver, depending on your layout. For example, we tested with both a Multimo portable dish and with a manual roof-mounted Camos Crank-up dish and we needed a different arrangement for each. Users with twin or quad LNB dishes would also connect up in a different way.
With the Multimo we needed to have the Nano outdoors, at the dish’s position so that we could see the screen as we moved the dish; we have a short length of cable always connected to the Multimo (so we don’t ever have to disturb the waterproof amalgamating tape which protects against water getting into the LNB through the cable joint) so we simply plugged this cable into the Nano. The main length of cable to the receiver was then plugged into the other connector on the Nano. The connectors on the Nano are labelled so you know which one must be attached to the dish side and which one is for the receiver side.
For testing with the Crank-up we needed to see the display while operating the crank-up controls but there is no access to the crank-up’s cable at this point; instead we connected the Nano at the receiver. The receiver is in a cupboard so in there we unplugged the dish cable from the receiver and plugged in a short extension piece which connected to the Nano which was propped up on a work surface outside the cupboard and visible from the crank-up position. The other Nano connection, to the receiver, used the supplied length of cable.
TIP: life is much simpler if you use slide-on connector attachments on the end of your cables so that you don’t need to undo or do up the threaded connector each time you make temporary connections. This advice applies whether you are using the Nano or other devices - like a simple sat finder - which you are connecting in line only temporarily.
By the way - the Nano is not designed to be left in line (it will interfere with the signal); once you are set up switch it off and unplug it and then plug the dish cable back into the receiver.
In use
Quick start
Press the single button to turn on the Nano, then press again to display the satellite you want to find. Start with the dish pointing on the low side, in roughly the right direction, and move the dish from side to side. The signal strength bars will increase or reduce whenever there is a signal being received from any satellite and from these signals the Nano will calculate the direction and distance to the satellite which you have selected; it displays guidance via the triangular graphics as already described. Move the dish as indicated until the Nano signals that you have found the correct satellite.
If your sweeps don’t find the satellite or produce the guidance response from the meter, raise the elevation of the dish a little and repeat.
Linger longer
Well we would, wouldn’t we?
Since our purpose was testing, rather than getting the job done and putting our feet up, we spent a lot of time moving the dish about and watching the effect on the screen to try to get a good understanding of how the direction indicating triangles responded in different positions. We wanted to be sure that it works as claimed. By the way, we purchased our unit: it was not supplied to us as a sample unit for testing. We bought it to test it because we think that what it offers is great in principle - but we wanted to be sure that we would be happy to endorse it.
In our testing we tried to take into account that we already know pretty accurately where the dish should be pointed because we wanted to assess how well the Nano would perform its role in an unfamiliar location - where, in our view, to justify its cost the Nano should make the job notably easy and reliable. We have plans for a further test, with the help of someone who is a complete novice - watch this space!
In reality it’s always helpful if you know where is the rough area of sky you need to start with (South East); and an idea of the elevation needed will help, even with the Nano, simply because you will get to your target quicker.
We were immediately impressed with the direction and distance guidance given by the triangle graphics and the subsequent ‘Found’ visual and melody confirmation was also very satisfying. In every instance the ‘Found’ result was one-hundred-percent reliable in that we were then able to view the channels on that selected satellite. We we able to find all four of the Nano’s satellites easily, and view their channels.
Most of the time, in order to get a result we did not have to think hard about what we were doing. However, something which we noticed early on was that the direction triangles did not alway behave as we expected. What we expected was this: as an example, let’s say that we see three triangles pointing left and so we continue to rotate the dish to the left; the display changes to two triangles, then one; meaning that we are getting closer to our selected satellite. One triangle means that the dish is now very close to the position of the desired satellite.
However, after continuing further left for a considerable amount the Nano has not ‘found’ this satellite. We would conclude, correctly, that we are too low or high and have passed under or below the satellite. But why did the left-pointing direction triangle not switch to a right-pointing triangle as soon as we went too far?
We have since come to understand that this is because the Nano has no way of refreshing its information on where the dish is pointing until it encounters a satellite; it can identify the satellite it is receiving signal from and if it is not the right one its embedded information about multiple satellites reveals the direction to the right one, relative to the one currently being received. Therefore if you pass below or above the target satellite the Nano will not know until it receives a signal from a satellite further on, and so it will continue to point in the direction it gave when it was last receiving a signal.
So imagine a line (more or less) of four satellites - as contained in the default pack. Two of these satellites will be on the outside, either on the left flank or on the right flank - and two will lie between the flanks. If you are finding one of the inner two satellites and go right past (because you are high or low), you will be ‘turned back’ when the Nano detects the flank satellite on that side; so you will see the triangle indications reverse. Now as it happens Astra 2 is on the left flank so if you miss it while moving towards the left you won’t be turned back quickly.
In practice, the manufacturer has explained to us that the Nano is also programmed with data for additional satellites beyond the four that are available for selection and for display; however, these satellites are located further away and their signal is weaker, so - depending on location - smaller dishes would not pick them up. So in our tests we did not have the benefit of this invisible outer marker.
At first this seemed like something of a handicap but we have worked out that it is easily dealt with: by taking note of the positions where the triangles change we reckon that they appear at increments of about 5 degrees of rotation. Therefore at the point where four triangles appear we are pointing about 20 degrees away; three triangles equals 15 degrees and so on - and when the signal changes to one triangle, we are only about five degrees away.
So it follows that once a single triangle appears you expect to hit the target almost immediately after, given that 5 degrees is a quite small movement - as shown by the arrows below:

This small movement needed means that you can easily tell if you have gone much too far - in which case raise the dish a little and turn back, watching the indicators as before. So not really a great hardship.
Installing alternative satellite packs
The default pack is pre-installed on the Nano so it can be used straight out of the box without any need to install anything. This procedure is only used if you want to change to a different pack
We followed the instructions in the user manual without difficulty, using a PC running Windows XP.
The first step in the one-time-only initial installation of the required drivers for the Nano onto the PC; the process is initiated automatically when the Nano is connected to the PC via its USB cable and invokes the computers standard ‘Found New Hardware Wizard’. We followed the prompts, which are repeated twice because there are two sets of drivers.
Hereafter, and whenever it is connected to the PC, the Nano will display ‘Program mode’ on its screen. Changing the satellite group could not be simpler: first, download the satellite pack onto your computer; depending on where you downloaded them from, you might have to unzip them after downloading. Double-click on the pack you want to install (see the details below) and in the small dialogue window which appears click on ‘Transfer’. Takes a few seconds and then the job is done. You can switch packs as often as you like.
The packs are available for download from the Manahattan support pages - or contact campervanstuff.com for information.
Default pack (pre-installed as standard)
Astra-2D 28.2E [Updater 28.2 1-N]
Astra-2A 28.2E [Updater 28.2 2-B
Astra-1 19.2E
Hotbird 13E
Pack 1
Astra-2A 28.2E [Updater 28.2 2-B
Astra-1 19.2E
Sesat-1 16E
Hotbird 13E
Pack 2
Astra-2A 28.2E [Updater 28.2 2-B
Astra-3A 23.5E
Astra-1 19.2E
Hotbird 13E
Pack 3
Astra-2A 28.2E [Updater 28.2 2-B
Astra-1 19.2E
Hotbird 13E
Eurobird-9A 9E
Does it work for us - and should you buy one?
Here’s our predicament: the Nano works very well and undoubtedly removes much hassle-potential from setting up your manual satellite dish. So what’s the predicament? - it’s that we - and others - do tend to praise the manual systems which we sell as being easy to set up even without the benefit of a device like the Nano. And generally this is true.
So why would you need a Nano, which is a quite expensive device - particularly compared with a standard sat finder?
It’s a question of degree of ease and convenience. Regular users of manual systems usually get the hang of setting it up quickly. But even for these users there are likely to be occasions when a combination of factors leaves them experiencing unusual difficulty; they can then spend frustrating time trying to work out whether on this occasion they might be pointing at the wrong satellite, or whether perhaps there is an obstruction just within the correct line of sight which might be corrected by re-locating the dish and starting all over again; or has the dish or the receiver developed a fault?
And then there are also users who just never get along with setting up their systems, perhaps because they aren’t technically minded or don’t do it regularly enough - or maybe because they just don’t have the patience when all they want to do is set up quickly and forget about it.
What the Nano offers is reliability and convenience. Even expert users, having mastered the process of finding the satellite by other means, might find that it is no longer a challenge and is more of a chore.
The ultimate step-up in convenience would be a fully automatic dish - but at a very much greater cost.
For us, even though we generally get our crank-up deployed within a very short time, the Nano will have a place in the cupboard - just in case.
© All content copyright of Enetgy Limited - enetgy.co.uk - for campervanstuff.com, 2010
Move to the right .........